Google often updates the Chrome OS for Chromebooks. These updates add new features, improve performance, and fix bugs. In this post we’ll look at some of the ways to make sure your Chromebooks stay update to date and ways to update those that don’t automatically update. This includes using a recovery flash drive.

There are numerous ways school provide Chromebooks to students. These are a few of the ways I have commonly seen Chromebook deployed.
- 1:1 and students take them home daily
- 1:1 but students leave them at school
- Classroom sets
- Carts available for checkout
- Department Chromebook sets
- Grade Level Chromebooks
Google Chromebooks automatically download updates in the background while they are in use, but making sure the updates are installed can be a bit of a challenge with some deployments.
Google Constantly Updates Chrome OS
Chrome OS is always evolving. Google releases a new full OS update about every six weeks! They release minor security and bug updates every 2 to 3 weeks. Sometimes minor updates are released even faster.
Amazingly, Google is able to push out all of these updates with little to no impact on users. The Chromebook downloads updates in the background while it is on and being used, without interrupting the user’s experience.
The next time the Chromebook turns on after a reboot or shut down, it boots up with the new OS version. That means no “please wait while we install updates” messages.
On our Chromebooks using Kiosk mode and those used my multiple students, the Chromebooks usually auto-install any downloaded updates when the current user logs off. The update happens so quickly, most users don’t even notice.
Keeping our 1:1 Chromebooks up-to-date is a bit more difficult. Most of our students don’t sign out of them. I understand why. I typically don’t sign out of mine either. However, one thing I do look for is an up arrow in the right lower corner by the clock. If you see one, that means an update has been downloaded and it ready to be installed. The update would automatically install if the user signed out, but we’ve already discussed this.
Let’s look at things you can do to promote Chrome OS updates.
Remotely Force A Chromebook To Reboot
As of right now, Google has not given us a way to force a reboot on anything but a Chromebook running in Kiosk/Public Session. I can see the negative side to allowing this such as when would you force the update? 7:00PM? 11:00PM? 6:00AM? Since students often take them home, when would be the right time?
The “problem” is, students are using their Chromebooks late into the evenings. Personally, it’s an issue I’m glad we have. I hope we do eventually get the ability to schedule a reboot. Perhaps we could schedule it for 2AM and the Chromebook could ask the user if it’s an OK time or postpone.
To take a page from Microsoft’s book, how many of you have experienced the 14 minute countdown when Windows says basically, I’m rebooting soon, your not going to stop me ( there are ways), better save now. At least with Chromebooks, saving typically isn’t an issue.
Look For Downloaded Updates
Until we have a different solution I recommend you have your students look for the up arrow when an update is ready to be installed and click it.

Another solution would be to sign out, just for a minute, each Friday.
Why does it matter if our Chromebooks aren’t kept up to date?
Well, Google is always working on improvements for their OS including things like security and performance. I can give a specific reason that we dealt with for while. I call it the Pre-53 issue.
Chromebook Flashing Black Screen Issue
In Chrome OS 53, a change was made to how account syncing is performed. This causes an issue not with Chromebooks running 53, but rather those running a version older than 53. Once a user logs onto a Chromebook running 53 they could no longer use an older OS version. When they tried, the typical result was, the screen flashed a few times and either left them on a white page or logged them off the Chromebook. Once the Chromebook was updated, the problem went away.
We saw this issue most often in schools that share Chromebooks between students and have added more Chromebooks to their fleet. Chromebooks are a few OS versions behind when unboxed. Our solution was to update the OS upon enrollment and prior to the Chromebooks being sent to the school.
Rotate Chromebook Usage
To avoid issues like these I also recommend you rotate the use of your Chromebooks. If you have 25 students, and 28 Chromebooks, don’t only use the first 25 and let the others sit until they are needed. Instead, rotate through all 28 weekly so that they all stay up to date.
Chromebook Sign Out Button

To make signing out easier, all of our Chromebooks have a sign out button at the bottom of the screen. If a user accidentally clicks on it, they are asked if their sure they want to sign out. This is configured using the Google Admin Console. Here’s how.
Add Sign out button to Chromebook
If you have admin rights in the Google Admin Console, you can follow these directions to add a Sign out button. If you don’t, your Super Admin can set it up for you.
- Log into the Google Admin Console
- Browse to Device Management > Chrome Management > User Settings
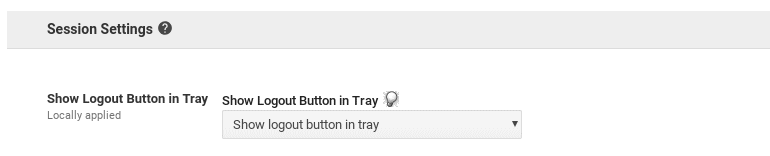
- Scroll down to the Session Settings section
- Choose Show logout button in tray
- Click Save
Force Chromebook Logoff
Another option is to force your Chromebooks to logoff when users close the lid and/or when it goes to sleep.
Assuming your Chromebooks a clam shell type, I you may want to force a log off when the lid is closed on Chromebooks you keep in carts. In most cases I would not make them logoff when they go to sleep.
I would not enable logoff for either settings if the Chromebooks are used in a 1:1 model. Students will not want to have to log on and reopen apps and documents when changing classes during the school day.
This could lead to students moving from class to class with their Chromebooks open which will probably lead to a higher drop rate causing physical damage to the device.
Manually Update a Chromebook
Every once in a while you may find a Chromebook that for some reason does not automatically download an update. In these cases you can check for updates manually.
By the way, you can quickly and easily find out what Chrome OS version a Chromebook is running without having to log onto it by following the directions in this post: Show Chrome OS Version More with Alt + V.
This is fastest way for me to check for an update.
- Log onto Chromebook
- Open the Chrome Browser
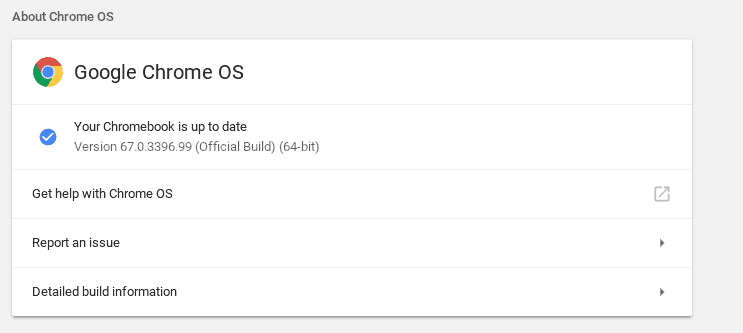
- Type chrome://help in the omnibox and press Enter

- Click Check for updates
Your Chromebook will then…um….check for updates.
Either it will find one and immediately start downloading it or it will tell you your Chromebook is up to date.
Occasionally, I have run into an issue in which the Chromebook reports it is up to date, but I know there is a newer version. There are a few things to check in this case.
- Are other identical Chromebook models updating to a newer version?
- Are you restricting Chromebooks to use only a certain OS in the Google Admin Console?
If you want to dive in a bit deeper you can check out this site to see a list of the the most recent Chrome OS version available for each model. In most cases you want to look at the stable channel.
http://cros-omahaproxy.appspot.com/
Update a Chromebook with a Flash Drive
If you know there is a newer Chrome OS version for your Chromebook and it will not update AND you are not preventing updates in the Google Admin Console, then one way to update the Chromebook is with a recovery flash drive.
Create a Chrome OS Recovery Flash Drive
A recovery flash drive is used to completely reload the Chrome OS on a Chromebook. You will need a flash drive that is at least 4GB in size. Everything will be deleted from the flash drive.
- Download Google’s free Chromebook Recovery Utility from the Chrome Web Store to another Chromebook or Windows computer. You will need administrator rights on a Windows PC to make the recovery drive.
- Once installed, launch the app.
- Click Get Started
- Click Choose Model from the List
- Choose your Chromebook’s Manufacturer and Model.
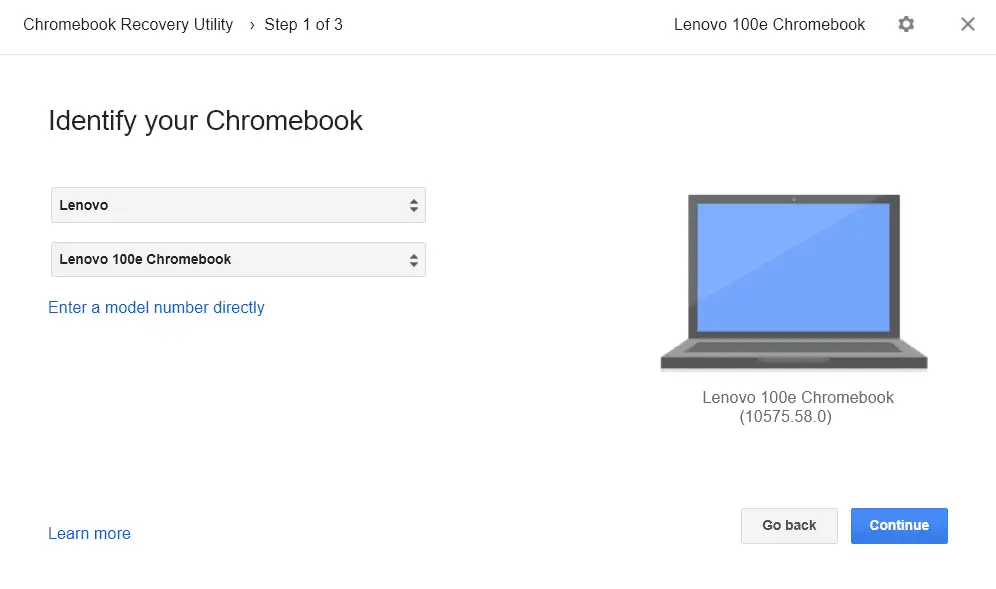
- Click Continue
- Select the flash drive you want to use from the list.
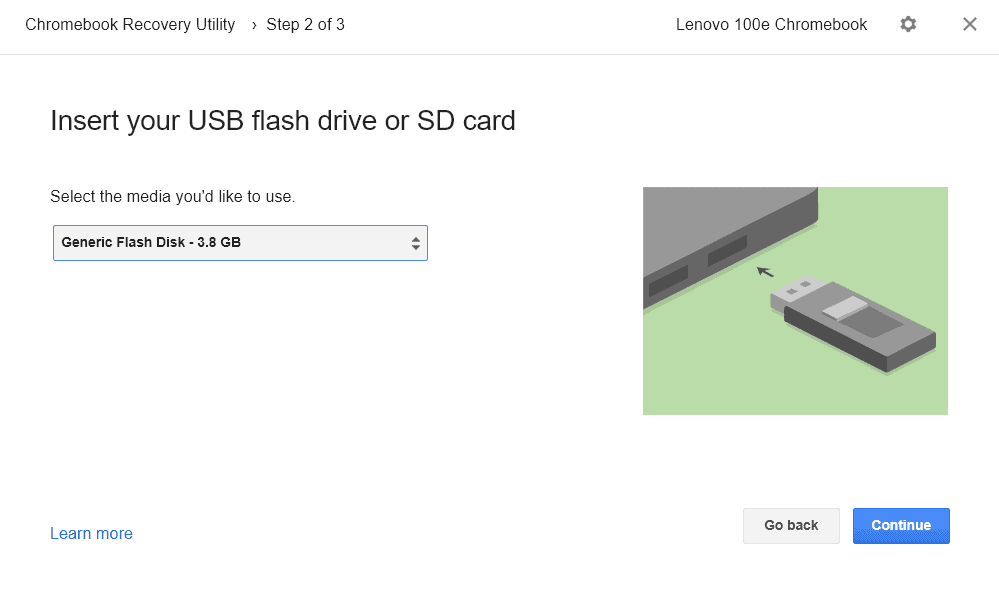
- Click Continue
- Click Create Now
- Now the utility will download the Chrome OS image and load it onto the flash drive. If using a Windows PC, you’ll be prompted to allow writing to the flash drive after the download is complete.

- After the recovery media is made click Done and remove the flash drive.
Update Chrome OS Using Recovery Flash Drive
Now that you have created your recovery media, you are ready to update your Chromebook.
- Boot up the Chromebook you want to reload
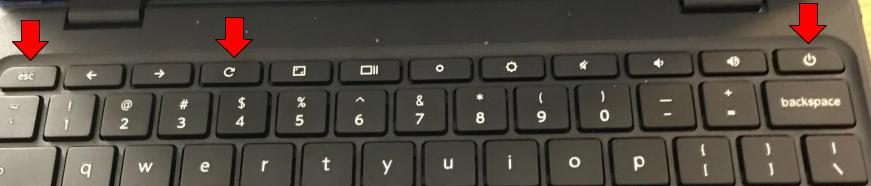
- Press esc + reload + power
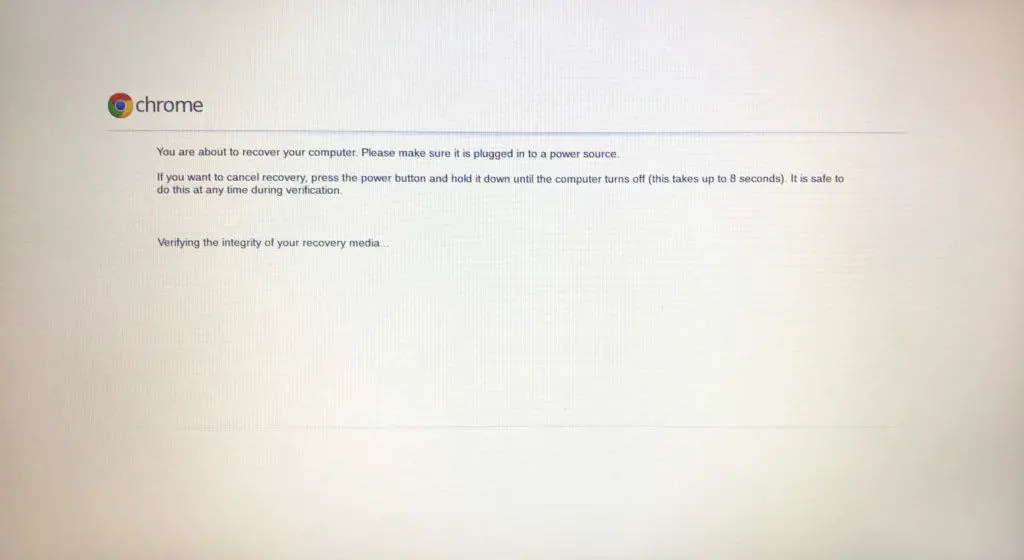
- Your Chromebook will restart and show the page below. Note: This can take a few seconds.

- Insert the recovery flash drive you created earlier.
- The Chromebook will automatically change to the page below
- After 30 seconds, your Chromebook will begin replacing it’s Chrome OS with the version that you loaded on your recovery flash drive.
- When its finished you will see a screen telling you to remove the flash drive
- Remove the flash drive and the Chromebook will reboot
When the Chromebook boots up it will be like new / out of the box. If the Chromebook is manged in the Google Admin Console and you are forcing re-enrollment (recommended), the Chromebook will have to be enrolled in your domain before it can be used.
Why Force Chromebooks to Re-enroll After resets
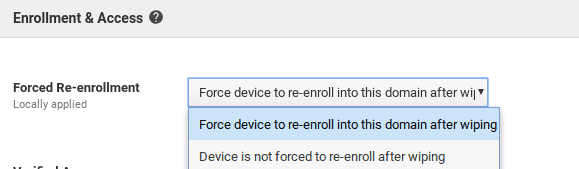
If you do not have this enabled in your Google domain for your managed Chromebooks, I highly recommend that you enable it. This way anytime your Chromebooks are reloaded, the first thing after connecting to Wi-Fi the Chromebook will ask the user to do is enroll it in your domain.
I also recommend configuring your domain to allow any user to enroll a Chromebook. This way if a student resets a Chromebook (option cannot be disabled and is easy to do) the next user of the Chromebook can enroll it.
The process only involves a domain user to log into the Chromebook. Otherwise your Chromebook can not be used by anyone until some with enrollment rights enters their credentials.
We’ve covered everything from how Chromebooks update automatically to how to manually update a Chromebook. Besides knowing how to update your Chromebook, knowing how to troubleshoot common issues is also useful. Take a look at how to fix the most common issues on my 7 Easy Chromebook Troubleshooting Tips to Fix Common Issues post.
Thanks for reading and sharing!