Last school year, my 5th grade daughter had a major at-home project and the last part she had to complete was a one-page newspaper. The directions said it had to have three articles and each article needed to be in its own column. So, we used Google Docs.
How To Create Columns In Google Docs

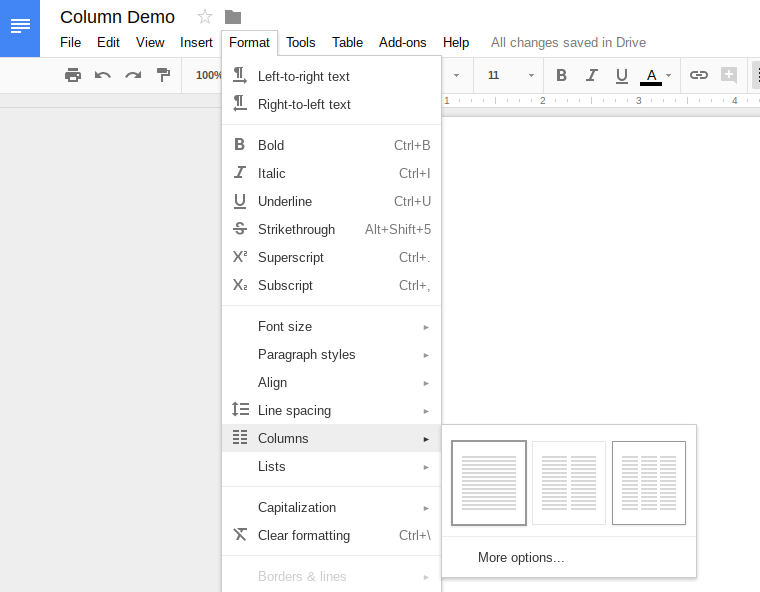
In your Google Doc, click on Format > Columns and choose if you want one, two, or three columns
If you don’t have any text in your file, you won’t see much happen. However, notice the ruler at the top of the document now shows column breaks.

When you start typing you’ll (by default) type in column one until the end and then your text will continue into column two.
How To Type in the Next Column in a Google Doc
You could press the enter key until you move to column two. However, if you later add or subtract text in column one your line spacing could change.
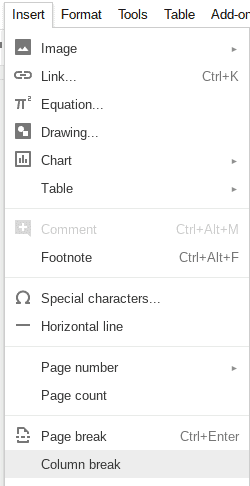
Instead, when you are ready to move to the next column, insert a Column Break

- Put your cursor at the end of your text
- Click the Insert Menu
- Choose Column break.
Now you can make changes to column one without affecting the line spacing in the other columns.
Add a Vertical Line Between Columns in a Google Doc
Sometimes you may want more visual separation between your columns. Google Docs can easily put a vertical line between your columns.
- Click the Format Menu
- Choose Columns
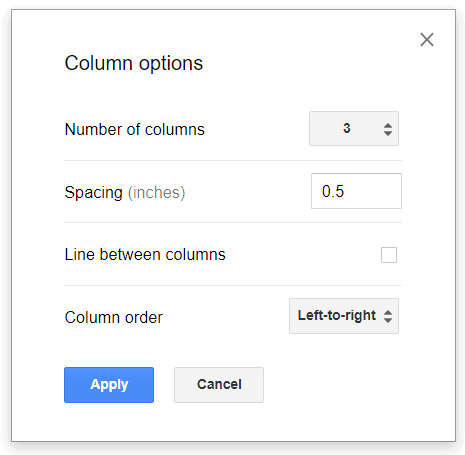
- Choose More options…
- Put a checkmark in the box next to Line between columns.
- Click Apply

Inside of Column options, you can also change:
- The number of columns
- The spacing between
- The Column order: Left-to-right or Right-to-left
Using Headers and Footers in Google Docs
So now you have all of your info typed into your columns, but you want to put some information at the top or the bottom of the document. Let’s continue my example of making a newspaper.
The newspaper needed a title, but we didn’t want the title to be part of a column. We wanted it to span the entire top of the paper. What we needed was a header.
Inserting a header is so simple, that it doesn’t need steps. Just click the Insert menu and choose Header.

When typing in the header section, a checkbox is available if you want your first page header and footer to be different from other pages.
You can follow the same process to insert a footer into the document. Click the Insert menu and choose Footer.
Manage Columns in Google Docs using an Android Device, iPhone, or iPad
You can edit the text inside existing columns in a Google Doc using an Android device, iPhone, or iPad but you cannot add or remove a column. You also cannot modify column options. Due to screen size, columns are listed one about the other on a mobile device rather than side by side.
Tip: It is easier to identify the columns on a mobile device if you enable to the vertical line between columns. You can turn this on or off using a desktop or Chromebook.
Change Page Margins in a Google Doc
If you have your columns set up the way you want but need to adjust the page margins, follow these steps.
- Click File
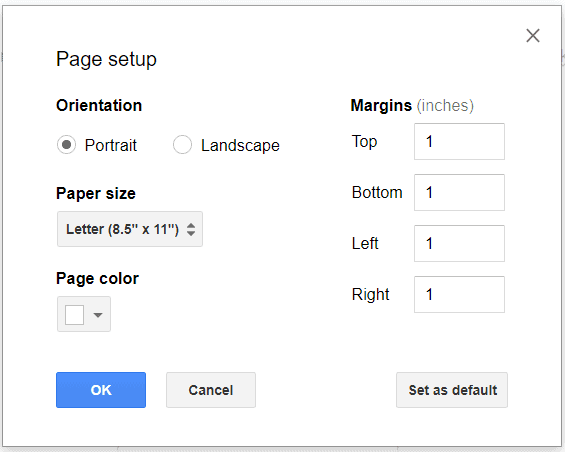
- Click Page setup
In the Page setup window you can change the:
- Orientation
- Paper Size
- Page color
- Margins. Tip: if you want your margin to be 1/2 an inch enter .5
If you want to use the changes you made as the default for all of your make going forward you can click Set as default. This will not affect Google Docs that you have already created.

Now that you know how to make columns check out my post on how Google Slides Can Be An Alternative To Microsoft Publisher.

